Nothing ruins a well drawn cartoon head like ugly drawn hair. Pretty much, what you want to avoid, is the spaghetti hair effect. You don't want your hair drawing to look like you're just putting down a bunch of lines from the top of the head. It really doesn't look good at all.
In this lesson I'll show you three simple ways to approach hair that will make your cartoons look far more professional.
This tips will are:
Creating a clear hair line and hair shape.
Making "Hair Ribbons."
Creating highlight shapes.
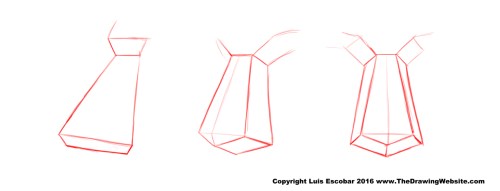
Before I begin, let's take a look at some very simple cartoon hair examples you can easily use even now...
Simple Cartoon Hair Examples
These examples do follow some of what I'm going to talking about in this lesson. At this point though, if you want to start drawing hair, you shouldn't get too intimidated. Just start drawing what you think looks good. You can apply the info from this lesson if you want to finesse your drawings:
You're going to design your character's hair using flat shapes until you come up with something that seems right to you. This includes defining where the hair line is.
Why?
Well, because when we look at a person in real life, we don't see every individual hair strand. What we see is a mass of hair that creates a certain shape. We recognize it as lot's of hair and we notice it's texture but our first impression is it's shape.
When drawing cartoons, we simplify this even more and imply hair with hair shapes. They can be simple or complex, depending on the style of cartoon.
Here's what I mean:
Believe it or not, when I'm life drawing a person's hair, I begin by simplifying the hair into a flat shape and defining the hair line so I can get a handle of what I'm going to draw.
For the simplest of all cartoon hair types, you're basically done. You really don't have to go any further than this.
However, if you want to take further, you can start adding a bit more detail and move to the next step.
Making "Hair Ribbons"
Instead of drawing every single strand of hair, it's helpful to separate hair into clumps. Similar to ribbons. They can look flat, thick or pointy. Whatever works you need them to be.
Here's an example of what I mean:
In order to put them on the head, you pay attention to the hair's origin point. This is one reason you define the hair line. It's a point of origin:
Once you find these origin point you create ribbon shapes within the hair shape you've established. You're essentially defining the way the hair flows. You can make this simple or complex, it's up to you:
There's is no right or wrong here, you it either looks right to you, or it doesn't.
Creating Highlight Shapes
You can now begin to create highlight shapes, if you want.
Here's the thought process on how to do it:
Using the hair shape we've already established, here's how I place the highlights:
A good rule of thumb is, "less is more." If you can get away with one highlight, you're good. If you need more than one, then add another. If you find you need even more, you're in danger of over doing it.
However, this does depend on the style you're after.
And that's it, that's how you do hair.
Now let's take a look at how these three hair drawing tips work within different naturalistic cartoony styles.
Out of all the features on the head, ears are treated most like an afterthought. I know that I ignored them for most of my drawing career. It's rare when anyone really pays too much attention to a drawing of an ear, unless it's just down right terrible.
It doesn't really help that cartoon ears are almost error proof. You can almost draw anything, call it an ear and you're done.
When it comes to drawing more naturalistic cartoon ears, you can get away with knowing pretty much nothing about ear anatomy and end up with a good drawing of an ear. Because of this, I won't breakdown an ear anatomically in this lesson. But what I will do is give your some compound form formulas you can use to draw a solid looking three dimensional looking ear on a naturalistic cartoon head.
I will also show you some simple details to use when drawing in Freddy Moore, Bruce Timm and Takahiro Kimura styles which you can draw on the formula. However, before I do, let's take a look at some simple cartoon ears.
Simple Cartoon Ears
Here are some examples of common cartoon ears. These are the simplest kind of ears you can draw:
This is not an exhaustive example. You can find more by looking at other cartoons and you can even make up your own.
Naturalistic Cartoon Ear Formula
If you want to draw something that looks just a bit more natural and a bit less cartoony, the formula below ought to help:
That's basically it. With this you can add any style on top and you can get a decent looking, naturalistic, cartoon ear.
Ear Styles
Let's take a look at the formula in action. We take the D shaped wedge formula, then we add three different styles to it:
And for the sake of completion, let's take do a turn around of all the head types:
Drawing naturalistic noses is almost as complicated as drawing naturalistic eyes. HOWEVER drawing cartoon noses isn't nearly as hard. You can actually get away with a lot less understanding of actual noses and still be able to draw convincing cartoon noses.
In this lesson I'll talk about general cartoon noses. Which really can be just about any shape.
I'll also give you a "catch all" nose base formula that can be adjusted to make just about any kind of simple naturalistic looking nose. Finally, I'll go into Freddy Moore, Bruce Timm and Takahiro Kimura anime nose formulas. We'll see what makes those type of formulas tick.
General Cartoon Noses
Let's talk about general cartoon noses. As I stated above, cartoon noses can be just about any shape. Simple cartoon noses are tough to mess up.
All you need is the spirit of experimentation and you can come up with all kinds of noses. The only thing is deciding whether you like what you drew. If you do, then great, you've got a nose. If you don't then try again and again, and again, until you get what you want. It's up to you.
To help you get started, here are some suggestions:
Simple Nose Formula
If you want to draw a cartoon nose that looks a bit more natural, there's a formula I stumbled into that has really worked well for me over the years. Long before I understood drawing noses, I used this formula to make it seem like I knew what I was doing.
I still use it to this day, only I now apply much more structure on top of it to achieve the kind of noses I want to draw. Here's what the nose formula looks like:
Below I'll explain what the reasoning behind the formula is. I'm not doing a step by step because, this nose shape is essentially a modified cube. If you don't know how to do this yet, you need to go back and practice your forms:
The nose can be broken down into a modified box. However, the most important addition is to add a wedge at the bottom, in the shape I drew it above.
This wedge best simplifies the complex area of the underside of the nose, which tends to stick out a bit. It's not completely flat underneath.
As you can see in the profile, it also moves back at an angle. Noses tend to this this and this simplification reinforces it from the start.
As you can see from all the views, from the tip of the nose to the back, there's a slight slant down. In most noses, you can see it's underside. The center of the underside is further down than nostrils.
Although the nose is simplified into a box, the sides are not perpendicular but rather flare out.
This is not absolutely true for all noses everywhere. There is a lot of variety in noses. However, this is a good starting point, and you can make adjustments based on the type of know you're drawing using this formula.
Once you know how to construct the formula, this is how you use it to create noses. Say you have this:
It's merely a matter of selecting a few of the lines to imply the rest of the nose. You don't want to draw every line. Just enough. This comes with practice and trail and error.
You can use quite a bit of detail, like the drawing above or you can try simplifying even more like the drawing below.
You can even leave some of the construction you used to make a nose as part of your final look. It makes the nose more graphic and less realistic.
I started with this formula because it really helped me most. I had tried drawing noses other ways and they never seemed to look right.
From this point on, we'll analyze other noses, formulas, and looks. I've found, at the very least, that the nose formula above helps me create the look of the noses I'll be talking about below. Although the Freddy Moore Nose, has it's own formula. So let's get take a look...
Freddy Moore Nose
Here we are again with Freddy Moore. However, I'm not so sure that his way of drawing noses has become universally accepted in animation as many of this other techniques.
That said, many artists use it to great effect.
Alright so, here's the Freddy Moore nose formula:
That's it? Yup. It's just a modified ball, or egg shape. Simple right?
In practice, you can do this with it:
And if you change just the bridge of the nose, you can vary it up a bit:
However, the tricky thing about this kind of nose is it's lack of structure. Where do you but the nostrils? Where's the tip of the nose?
You may want to break up the structure of this nose just a little to give you something a bit more solid to guide your final lines with. Like this:
The above is pretty much a variation of my won nose formula breakdown. Still, even without my breakdown, this nose formula has been used by many artists for years. It may be more helpful to you than my formula. Give is a try.
Here's two quick turn around of the nose to use. This is only two types of the many ways you can use the nose formula. The one on the left is heavily based on Disney's Little Mermaid. While the one on the right is far more cartoony. Don't assume they're the only way to draw this kind of nose:
Alright, now you know what I know about the Freddy Moore nose. Let's examine other types of nose designs.
Bruce Timm Nose
Male Bruce Timm Noses vary tremendously. However, there are two nose types he seems to turn to most, the "Kirby nose," and a hook nose. Some of his hero character's noses are heavily influenced by Silver Age comic artists like Jack Kirby. I say this only because Bruce Timm himself has mentioned it in an interview he did in Modern Masters Volume 3: Bruce Timm.
For the most part, I can say, if you use my nose formula, you should be able to produce the variety of nose types he tends to draw:
Female Bruce Timm noses vary far less. Most of the time, he uses one type of nose for almost all his women.
This type of nose has some influence from noses drawn by Dan Decarlo, who was arguably the best Archie comics artist, who drew in the "Archie Style." Bruce Timm also mentions this is the same interview I sited above.
Here's a Bruce Timm female nose. I show you how you can use my formula and the Freddy Moore formula as a base for drawing it:
Here's a male and female head turn around. Again, these are just one of many ways you can approach this style:
Takahiro Kimura Anime Nose
One of the reasons I chose to highlight Takahiro Kimura's anime style instead of any other is because I happen to like the way he sometimes draws noses. He tends to draw men's noses in such a way that you can often see the formula they're made of.
Meanwhile his women's noses are often so simple the sometimes he simple draws the bridge of the nose leaves it at that...and it works. The Male noses tend to explain themselves pretty well:
It's the female noses that are tricky. They're so simple looking that you could argue there isn't any structure there at all. You'd be half right. I've seen him draw noses that simply don't really work and it's obvious he was just putting a line down. However, in animation, everyone has to be able to have all the characters look the same no matter who draws it. This means that even simple nose designs like Takahiro Kimura's have to have some structure:
That's one approach you can take when drawing noses.
Below I created a turnaround you can use for both males and females. Again, this turn around is not a definitive version on drawing in this style, it's just one way to go.:
Video
I while back, I made a video about drawing my favorite nose drawing formula. I'm posting the link below:
That's what I've got to say about noses. I hope it's helpful. Time to move on.
Questions?
I can’t help you if you don’t ask.
What’s your nose formula questions?
Is there something you’ve always wanted to know about cartoon nose formulas? Ask.
I’ll give you my best answer and, who knows, probably write a post about it.
Leave any comments and questions in the comments below.
Or better yet, sign up to receive more information via e-mail. You’ll get extra tips and advice. You can ask me questions that way also.
If you’re embarrassed because you can’t draw a straight line or even a good stick figure. If you WANT to know how to draw but don’t know where to begin — you’ve come to the right place.
19 year industry professional animator and storyboard artist Luis Escobar will teach you what you need to know as if you’re where learning Kung Fu. Only you’ll be learning to draw.
So click on the “If You’re New, Start Here” page below and get started.
You can email me at: TheDrawingWebsite(at)gmail(dot)com
If you’d like to send me a donation: paypal.me/LuisErnestoEscobar

 Nothing ruins a well drawn cartoon head like ugly drawn hair. Pretty much, what you want to avoid, is the spaghetti hair effect. You don't want your hair drawing to look like you're just putting down a bunch of lines from the top of the head. It really doesn't look good at all.